September 17, 2010

Salata cu fasole verde si branza Feta/ Feta and green beans salad


Pentru ca imi place fasolea verde, mi-am facut provizii de la o ferma din apropiere (pe langa alte multe legume). Am spalat pastaile, le-am curatat numai de codita, le-am lasat sa se zvante putin si le-am pus in pungi cu fermoar si apoi in congelator. Cand o sa vreau sa gatesc, le pun din congelator direct in apa fiarta, si sunt gata de salata.

Reteta de azi am gasit-o cand cautam altceva pe site-ul Food Network, si mi-a placut foarte mult ideea de fasole verde si branza. Eu i-am adaugat cateva smochine, care au fost in sezon. Foarte dulci si moi, s-au potrivit bine cu branza sarata.

Ingrediente:

aprox 500 gr fasole verde proaspata (se poate folosi congelata)
1/2 ceapa verde taiata rondele (eu am avut o ceapa foarte mare)
1 cana nuci (250 ml)
1 cana branza Feta (250 ml)
4-5 smochine proaspete, taiate in sferturi

Pentru dressing:

1/2 lingurita sare
piper proaspat macinat
otet (4 linguri)
ulei de masline extra virgin (aprox 8 linguri)

Cantitatile sunt aproximative, pentru ca nu le masor. Uleiul ar trebui sa fie dublul otetului.

Se amesteca sarea, piperul si otetul intr-un castronel si se bat cu telul, se adauga uleiul in fir subtire, batandu-se in continuu, pana cand tot uleiul este incorporat.
Pentru a testa dressingul, se intinge cu o bucatica de fasole in dressing, si se gusta.

Se opareste fasolea: se pune o oala cu apa la fiert. Cand incepe sa fiarba, se pune fasolea si se lasa 5 minute, pana cand este patrunsa putin, dar nu prea moale. Se scoate si se pune in apa cu gheata, sa se opreasca fierberea, si apoi se scurge.

Pentru a coace nucile, se incinge cuptorul la 180 grade Celsius (350 Fahrenheit). Se pun nucile intr-o tava intr-un singur strat si se tin la cuptor 10-15 minute, pana cand se rumenesc.

Se asambleaza salata: intr-un bol se pune fasolea, ceapa, nucile si smochinele. Se presara deasupra dressingul, si se amesteca. Se serveste cu branza faramata deasupra.

Sper ca o sa va placa la fel de mult ca si mie!


Because I like green beans, I made a little stock for the winter from a neighborhood farm (along with other nice vegetables). I washed the beans, I cut only the stem, let them dry a little and place the beans in plastic zipper bags and after that in the freezer. When I’m going to be in a mood for some green beans, I’ll just place them in boiling water, and they’re ready for salad.

I found today’s recipe when I was looking for something else on The Food Network website, and I liked the idea of pairing the green beans with Feta cheese. I also added some figs, it’s their season. Being sweet and soft, they were great with the saltiness of the cheese.

Ingredients:

About one pound of fresh green beans (frozen can be also used)
½ red onion sliced (I had a large onion)
1 cup walnuts
1 cup Feta cheese
4-5 fresh figs cut in quarters

For the dressing:
½ tsp salt
Fresh ground pepper
White wine vinegar (or cider vinegar) about 4 tbsp
Extra virgin olive oil (about 8 tbsp)

The quantities are approximate, I didn’t measure. The oil should be the double of the vinegar.

Whisk the salt, pepper and vinegar. Add the oil, little at a time, whisking continuously.
To test it, dip a piece of green bean in the dressing and taste it.

To blanch the green beans, place a pot with water on medium heat. When the water is boiling, add the green beans and boil for 5 minutes. Remove the beans and place them in an ice water bath, to stop boiling. Drain and set aside.

To roast the walnuts, preheat the oven at 350 degrees. Place the walnuts on a sheet pan and place them in the oven for 10-15 minutes until golden brown.

To make the salad, place the green beans, onion, walnuts and figs. Drizzle the dressing and toss. Serve with crumble Feta cheese.

I hope you enjoy it as much as I did!

September 15, 2010

Sandvisuri cu vinete/ Eggplant sandwiches


Sandvisurile calde, alaturi de o supa calda sunt pranzul perfect pentru americani. Eu nu fac sandvisuri foarte des, dar acestea au fost asa de bune, incat merita incercate.

Ideea pentru sandvisuri mi-a venit la un picnic, unde una din prietene, vegetariana fiind, a mancat numai vinete pe gratar. M-am gandit sa integrez vinetele coapte in sandvisuri. Primul sandvis este idee personala, un sandvis vegetarian. Cel de-al doilea este o derivatie de la un sandvis clasic american: BLT (Bacon, Lettuce and Tomato) adica in traducere: costita afumata, salata verde si rosii.

Cand fata care imi facea pregatirea in prima zi la restaurant tot zicea "BLT", habar nu aveam ce inseamna, dar am aflat destul de repede. Si cand l-am si incercat, mi-a placut foarte mult. Combinatia de costita afumata sarata si legume proaspete este delicioasa.

Prepararea vinetelor:

O vanata medie, se spala si se taie felii rotunde cu grosimea de aprox 1 cm. Se pun pe un tocator si se presara cu multa sare. Se lasa 15 minute, timp in care sarea va extrage sucul amar si vinete. Vinetele se spala sub jet de apa si se tamponeaza cu un servet. Se presara putin ulei de masline.


Se pun pe gratarul incins (se pot face si pe plita) pentru cateva minute pe fiecare parte, pana cand se rumenesc. Se iau si se dau deoparte.

Pentru primul sandvis am folosit ceapa coapta: o ceapa medie curatata de piele si taiata rondele putin mai subtiri decat vinetele. Ceapa am dat-o si pe ea cu putin ulei si am copt-o impreuna cu vinetele (un cleste de bucatarie este foarte bun pentru apucat ceapa cand se intoarce). Eu nu am avut ardei grasi in acea zi, dar daca aveti, coaceti si un ardei. Cateva felii de ardei copt se imperecheaza foarte bine cu vinetele.


Sandvis vegetarian (pentru 1 sandvis):


2 felii de paine (de orice fel doriti, eu am folosit foccacia taiata jumatate)
1 lingura de maioneza din borcan
2 felii de vinete coapte ca mai sus
2 felii de ceapa coapta
2 felii de rosie taiata rondele

Se ung feliile de paine cu maioneza, si se asambleaza sandvisul. Inainte de a se pune felia de paine deasupra se presara putina sare.

BLT cu vinete (pentru 1 sandvis):


2 felii de paine prajita (in prajitorul de paine sau pe plita)
1 lingura de maioneza
2 felii de costita afumata
2 felii de vinete coapte ca mai sus
2 felii de rosie taiata rondele
frunze de salata verde, andive sau chiar rucola sau spanac, orice verdeata aveti la indemana

Costita afumata se pune intr-o tigaie fara ulei, la foc mediu


si se prajeste, intorcandu-se pe ambele parti, pana cand toata grasimea este topita si costita este crocanta. Se scoate pe un servetel sa mai absoarba din grasime.


Fiecare felie de paine se unge cu maioneza, apoi se asambeaza: frunzele de salata verde, vinetele, rosia si costita, apoi cea de-a doua felie de paine. Nu este nevoie de sare, costita fiind deajuns de sarata.

Pofta buna!


Warm sandwiches, along a hot soup are a perfect American lunch. I don’t make sandwiches very often, but these are so good, it’s worth to give it a try.
The idea came to me at a picnic, when one of my friends, because she’s vegetarian, had only grilled eggplants. I thought to integrate the grilled eggplants in some sandwiches.

First is a personal idea for a vegetarian sandwich. The second one is a twist on an American classic: BLT or bacon, lettuce and tomato.

When the girl that trained me in my first day at the restaurant, kept saying “BLT”, I had no idea what that was. I found out pretty soon, and when I had it, I loved it. The combination between salty bacon and fresh vegetables is delicious.

Prepare the eggplant:

Clean one medium eggplant and slice it ½ inch thick. Place the eggplant sandwiches on a board or on a rack and salt them abundantly. Let sit for 15 minutes, the salt will extract the bitterness out of the eggplants. Rinse and pat dry. Drizzle with a little olive oil. Place the eggplant on a hot grill (outside or inside), for few minutes on each side, until golden brown. Remove and set aside.

For the first sandwich I used grilled onion: I cleaned one medium onion, and I sliced it almost as thick as the eggplants. I drizzled some olive oil and I grilled it in the same time with the eggplant. I didn’t have bell peppers that day, but if you like it, grill some pepper slices too, they pair very nice with the eggplant.

Vegetarian sandwich (makes 1):


2 slices of bread of your liking (I used foccacia)
1 tbsp jarred mayo
2 grilled eggplant slices
2 grilled onion slices
2 fresh tomato slices

Spread the mayo on the 2 slices of bread, and ensemble the sandwich. Before you put the top slice of bread, sprinkle little salt.

Eggplant BLT (makes 1):


2 toasted slices of bread
1 tbsp jarred mayo
2 slices of bacon
2 grilled eggplant slices
2 fresh tomato slices
Few lettuce leaves (you can also use endive, arugula or spinach)


Place the bacon in a pan, and fry until crisp. Remove and place on a paper towel to drain the excess fat.

Spread the mayo on the bread, and ensemble the sandwich: lettuce, eggplant slices, tomato and bacon. There is no need for salt, the bacon is salty enough.

Enjoy!

September 09, 2010

Fasole verde si usturoi in doua feluri/ Green beans and garlic two ways


(Please scroll down for English version)

Imi place fasolea verde, si incerc sa gasesc cat mai multe feluri de a o gati. De obicei folosesc proaspata (e buna si congelata), niciodata conservata. Imi place sa fie putin crocanta cand o mananci. Una din retetele de azi este o reteta olteneasca din cartea lui Radu Anton Roman: "Bucate, vinuri si obiceiuri romanesti". Cea de-a doua varianta este inspirata de o reteta cu spanac dintr-o revista "Food Network Magazine".

Pentru amandoua retetele am folosit aprox 1 kg pastai de fasole verde, curatate de codite si oparite: se pune apa la fiert, cand incepe sa fiarba se pun pastaile pentru 5 minute, cat sa se patrunda si sa isi pastreze culoarea. Se scot si se pun in apa rece cu cuburi de gheata. Se scurg si se dau deoparte.

Varianta 1:

Ingrediente:

500 gr fasole verde oparita
4-5 catei de usturoi
sare si piper dupa gust
3-4 linguri ulei de masline
1 lingura de otet (optional)
1/2 cana iaurt
marar tocat (eu nu am avut cand le-am facut, dar sunt convinsa ca le da un gust foarte bun)

Cateii de usturoi se curata si se dau prin razatoarea mica. Se presara putina sare si se freaca cu o lingura de lemn, turnandu-se uleiul putin cate putin, pana cand se face o pasta. Se adauga otetul (daca va place mai acrisor), iaurtul si se condimenteaza cu sare si piper dupa gust.
Se amesteca cu pastaile si se presara deasupra marar.

Sa aveti pofta!

Varianta 2:


500 gr fasole verde oparita
3-4 linguri ulei de masline
8 catei de usturoi (mai maruntei daca se poate)
sare si piper dupa gust
2 linguri de seminte de susan prajite (modul de prajire il puteti vedea
aici)

Se incinge uleiul intr-o tigaie si se pun cateii de usturoi intregi. Se lasa sa se rumeneasca putin, intorcandu-se, cam 2 minute. Se adauga fasolea verde, si se lasa 3-4 minute, timp in care se condimenteaza cu sare si piper.
Se opreste focul, si se serveste cu seminte de susan presarate deasupra.

Pofta buna!


I like green beans and I try to find different ways to cook it. I use fresh green beans (frozen work well too), never from the can. I like it to be little crunchy when I eat it. One of the today recipes are from the south part of Romania (where I’m from) and it's inspired from Radu Anton Roman’s cookbook “Romanian foods, wines and traditions”. The second recipe is inspired by a spinach recipe from The Food Network Magazine.

For both recipes I used about 2 pounds of green beans, cleaned and blanched: put a pot with water to boil, and when it starts boiling drop the green beans in the boiling water for about 5 minutes. Transfer the green beans in cold water with some ice cubes. Drain and set aside.

1st Way (for the garlic lovers):


Ingredients:

1 pound blanched green beans
4-5 cloves of garlic
Salt and pepper after taste
3-4 tbsp olive oil
1 tbsp white vinegar (optional)
½ cup yogurt
Chopped fresh dill (I didn’t have that day, but I’m sure the dill will bring a nice touch to the party)

Clean the garlic and grate them on the small grater. Place them in a little bowl. Sprinkle little salt and with a wooden spoon mix them, adding a little oil at a time, until the mixture turns into a paste.


Add the vinegar (if you prefer more sour), the yogurt and check for salt and pepper.

Pour over the green beans and sprinkle dill on top.

Enjoy!

2nd Way:


1 pound blanched green beans
3-4 tbsp olive oil
8 small garlic cloves (small cloves if it's possible)
Salt and pepper after taste
2 tbsp toasted sesame seeds (how to toast the sesame seeds you can see
here)

Heat the olive oil in a pan, and add the garlic cloves. Toast the garlic for about 2 minutes, turning them from time to time. Add the green beans and mix. Cook for another 4 minutes. Season with salt and pepper.

Turn off the heat. Place everything on a serving platter and sprinkle sesame seeds on top.

Enjoy!

September 08, 2010

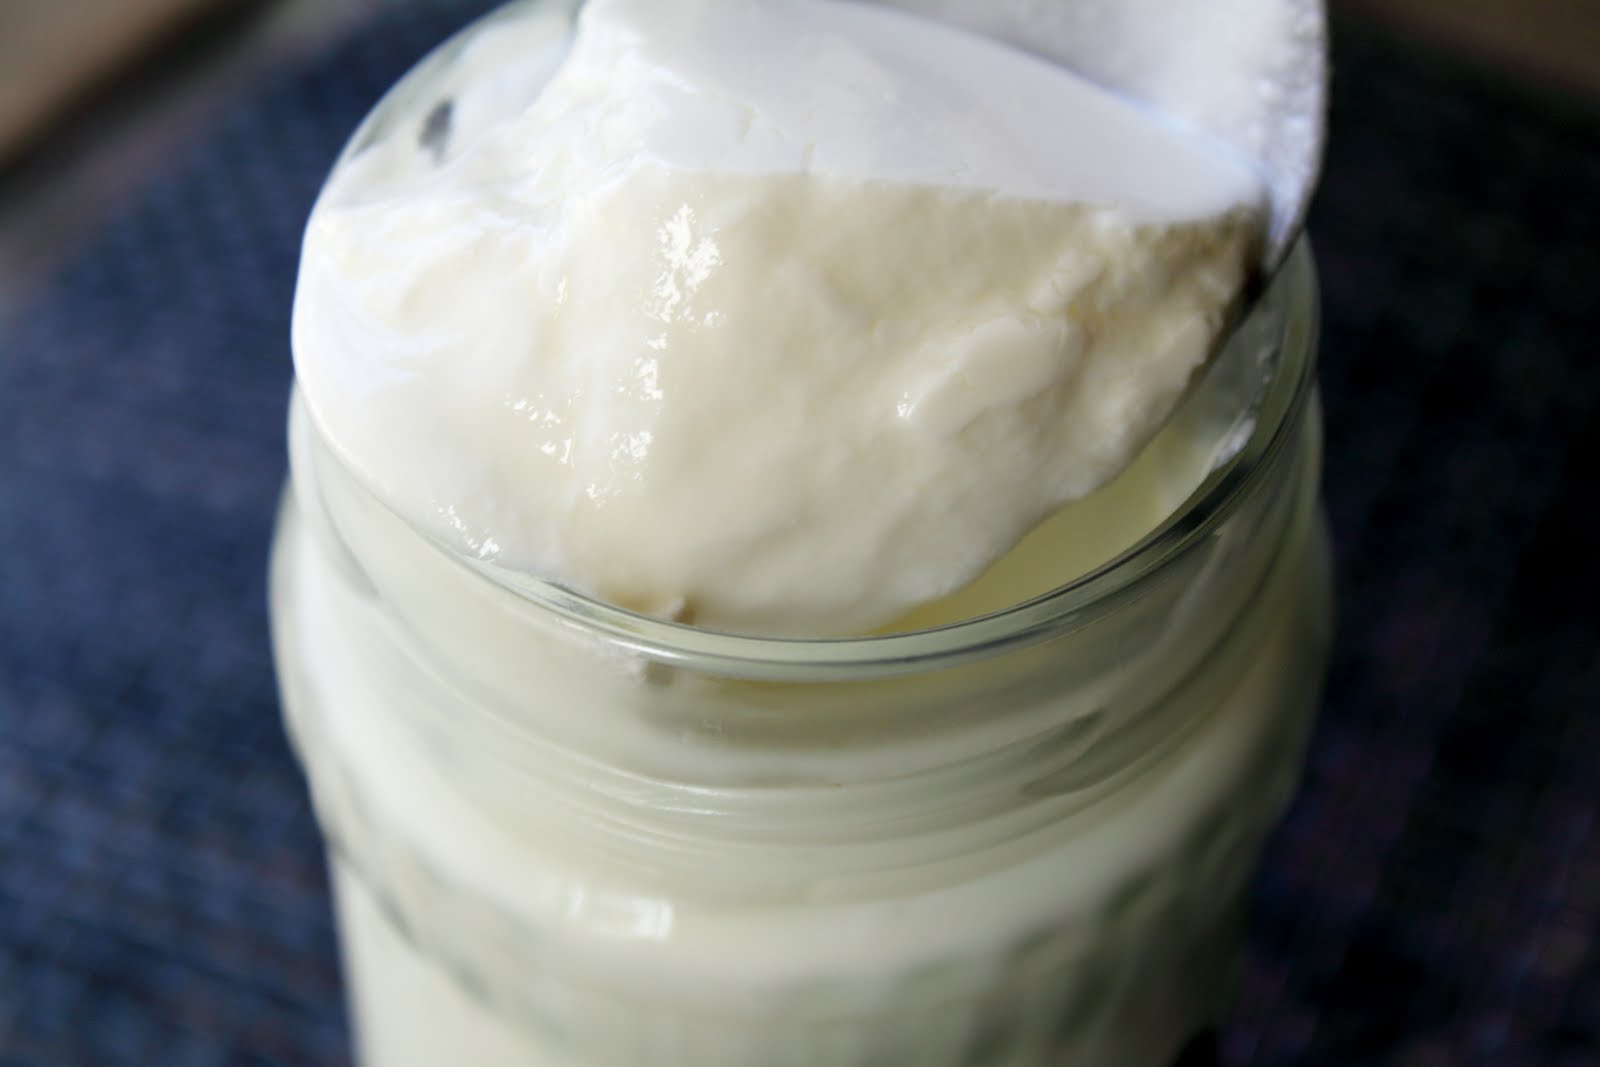
Iaurt de casa/ Homemade yogurt


(Please scroll down for English version)

Am inceput sa fac iaurt acasa in urma cu vreo 2 ani, dupa ce am citit cartea "Frantuzoaicele nu se ingrasa" a lui Mireille Guiliano. In carte, Mireille povesteste ca a invatat sa faca iaurt in una din calatoriile ei in Grecia, si a descris reteta cu iaurtiera si fara iaurtiera. Este o reteta simpla, si rezultatul este incomparabil cu cel cumparat din magazin.

Eu nu folosesc iaurtiera si imi place sa folosesc lapte organic integral. Pentru inceput este nevoie de putin iaurt simplu cumparat. Eu folosesc kefir, am incercat odata cu iaurt grecesc si nu s-a inchegat (iaurtul grecesc din magazin este gros si aduce mai mult a smantana). Dupa ce ati facut prima data iaurt, opriti din cel facut pentru runda urmatoare.

Imi place iaurtul simplu, sau sa il folosesc in loc de smantana ca garnitura la ciorba. Este foarte bun cu fructe, in special cu afine proaspete, sau cu miere. Combinatia cu miere mi s-a parut si mie putin ciudata prima data cand am auzit, dar merita incercata.


Ingrediente (pentru 2 borcanele de 400 ml):

800 ml lapte integral (masurati laptele in borcane)
2-3 linguri iaurt simplu cumparat (kefir)

2 borcanele curate si uscate, cu capac (daca folositi borcane mai mari, mariti cantitatea de iaurt)

Se incinge laptele intr-o craticioara pana cand incepe sa faca bule pe margine (nu se fierbe in clocot). Se opreste focul si se lasa laptele sa ajunga la temperatura camerei.

Se pune iaurtul intr-un castronel si se pune putin lapte racit, si se amesteca bine, amestecandu-se treptat in tot laptele, avand grija sa nu ramana parti de iaurt neamestecat.

Se toarna in borcane. Se lasa borcanele fara capac, acoperite cu un servet de bucatarie intr-un loc caldut pentru 8-9 ore sau peste noapte. Eu il las pe aragaz, aragazul meu are o lumina de veghe care tine aragazul mereu caldut. Se pot pune borcanele in cuptorul racit.

Dupa 8-9 ore iaurtul ar trebui sa fie legat si destul de tare. Se pun capacele la borcane si se pune in frigider. Se lasa sa se raceasca cateva ore si se poate consuma.

Pentru a face iaurt grecesc, se pune iaurt facut intr-o sita tapetata cu un servetel sau tifon, sita fiind sprijinita pe un castron. Se lasa cateva ore sau peste noapte in frigider, va rezulta un iaurt mult mai gros si gustos.


I started making homemade yogurt about 2 years ago, after I read Mireille Giuliano’s book: “French women don’t get fat”. In the book, Mireille is describing how she learned to make yogurt in one of her travels in Greece. She’s presenting the yogurt recipe with the yogurt maker and without a yogurt maker. Is an easy recipe, and the result is definitely better than store-bought.

I don’t use and yogurt maker, and I like to use organic whole milk. To begin you need a little good store bought yogurt. I use kefir (drinking yogurt). I tried once with Greek yogurt and it didn’t worked (store bought Greek yogurt is thicker and taste more like sour cream). After you made yogurt once, keep some for the next round.

I like plain yogurt, and I use it sometimes instead of sour cream. Is very good with fresh fruit, especially blueberries, or with honey. The honey and yogurt combination seemed a little odd to me first, but it’s worth to give it a try.


Ingredients (for 2 jars of 15 oz each):

30 oz whole milk (it can be measured in the jars)
2-3 tbsp plain store bought yogurt (kefir)

2 glass 15 oz jars with lid (if using larger jars, the ratio is about 1 tbsp yogurt for 1 cup milk)

Put the milk in a little pot and heat until it starts bubbling on the sides (don’t bring it to a boil). Turn off the heat and set aside until cools down to room temperature.

Put the yogurt in a bowl and add a little cooled milk, and stir to combine. Add more milk and stir, and turn everything back to the pot, making sure everything is well combined.

Pour into jars. Place the jars in a warm place, without lid, covered with a kitchen towel, for 8-9 hours or overnight. I keep it on top of the stove, my stove has pilot light, which keeps it warm. The jars can be placed on countertop as long as is warm inside the house (75 degrees or more), or inside cooled oven.

After 8-9 hours, the yogurt should be coagulated and thick. Put the lids on the jars and place in the fridge. Let cool for few hours and it can be eaten.

To make Greek yogurt, place the yogurt in a strainer with a piece of paper towel or cheese cloth inside. Hang the strainer on the edges of a bowl and place in the fridge for few hours or overnight, you’re going to have a very thick and tasty yogurt.


Enjoy!

September 06, 2010

Muschi de vita la gratar/ Grilled Rib-Eye Steak


(Please scroll down for English version)

Cat vremea ne mai permite un gratar, sa facem niste muschi de vita. Nu gatesc foarte des muschi de vita, dar reteta de azi merge la o petrecere, aniversare sau la o sarbatoare.
Imi place taietura "Rib-eye" (imi pare rau ca nu stiu echivalentul in romana), are mai multa grasime si va tine carnea mai frageda. Bucata mea a fost groasa de aprox 2,5 cm, si la 4 minute pe fiecare parte a fost mediu gatita, inca roz in mijloc. Daca folositi o bucata mai subtire, sau va place mai bine facuta, o tineti mai putin sau mai mult. Ideea cu saramura de dupa coacere este luata de la Nigella Lawson.

Ingrediente:

1 bucata de muschi de vita
sare si piper dupa gust
cateva linguri de ulei de masline pentru uns

Pentru saramura:

cimbru proaspat
2 catei de usturoi zdrobiti bine (pot fi lasati necuratati)
1/3 cana ulei de masline (80 ml)
zeama si coaja rasa de la o jumatate de lamaie
sare si piper

Se incinge si se curata gratarul. Se sterge cu un servetel inmuiat in ulei.

Carnea se scoate de la frigider cu aprox 15-20 minute inainte sa fie pusa pe gratar, nu trebuie "socata". Se da cu sare si piper si se unge cu ulei.

Se amesteca toate ingredientele pentru saramura intr-un vas intins.


Se pune carnea pe gratar, la foc mediu spre mare si se tine 4-5 minute pe fiecare parte, cu capacul de la gratar pus (pentru o bucata groasa de aprox 1 cm, se tine 3 minute pe fiecare parte).
Se ia carnea de pe gratar si se pune in saramura. Se mai lasa cate 4 minute pe fiecare parte sa isi ia aromele si sa se redistribuie sucurile din carne.

Se poate servi cu salata, cartofi sau legume. Pofta buna!


As long as the weather still allows grilling, let’s grill some steak. I don’t cook steak very often, but today’s recipe is good for a holiday, party or anniversary.

I like the Rib-Eye steak, it has some more fat than other cuts and it keeps the meat tenderer. My steak was 1 inch thick and at 4 minutes on each side cooking time it was cooked medium. If you have a thinner cut, keep it less time on the grill, or for more well done steak, increase the time at 5-6 minutes on each side. The soaking in juice idea I got it from Nigella Lawson’s show.

Ingredients:

1 Rib-Eye steak
Salt and pepper after taste
Few tbsp olive oil for greasing the meat

For soaking:
5-6 springs fresh thyme
2 cloves of garlic, smashed (the skin can be left on)
1/3 cup olive oil
Zest and juice from ½ lemons
Salt and pepper

Preheat and clean the grill. Wipe the grates with a paper towel soaked in oil.

Take the meat out of fridge 15-20 minutes before placing on the hot grill (it shouldn’t be shocked). Season the steak with salt and pepper and drizzle with some olive oil.

Mix all the soaking ingredients in a large bowl.

Place the meat on the grill, on medium to high heat, 4-5 minutes on each side, with the grill lid on (for an ½ inch thick steak, grill for 2-3 minutes on each side).

Remove the steak from the grill and place it in the soaking mix. Leave it for another 4 minutes on each side, to soak the flavors and redistribute the juices.
Serve it with potatoes, vegetables or a salad.

Enjoy!

September 05, 2010

Supa crema de rosii coapte/ Roasted tomato soup


(Please scroll down for English version)

Toamna incepe sa isi faca incet incet simtita aparitia... a venit iara timpul uneia din supele mele preferate.

Dupa o reteta a lui Tyler Florence si modificata putin de mine, aceasta supa este perfecta pentru zilele care incep sa se raceasca, gradina cu rosii si legume este pe sfarsite, iar in casa miroase a paine proaspata si rosii coapte.

Ingrediente:

1 - 1 1/2 kg rosii proaspete amestecate (lungi, rotunde, mari, tip cireasa sau strugure)
1 ardei gras rosu (sau gogosar)
6 catei de usturoi curatati
2 cepe mici
1/2 cana ulei de masline (125 ml)
sare si piper dupa gust
4 linguri de unt
1 litru de supa de pui sau de legume
2 foi de dafin
frunze de busuioc si cimbru proaspete (se pot inlocui cu uscate)
1 cana de frisca lichida neindulcita (200 - 250 ml)

Echipament special: blender.

Se incinge cuptorul la mare 230 grade Celsius (450 Fahrenheit).

Rosiile, ardeiul si ceapa se taie bucati mari.
Se pun rosiile, ardeiul, ceapa si usturoiul pe o tava mare, intr-un singur strat, se condimenteaza cu sare si piper dupa gust si se presara uleiul de masline.
Se baga tava la cuptor aprox 30 minute pana cand legumele sunt rumenite.


Optional, pentru decor se pot opri cateva rosii cireasa coapte.

Se incinge untul intr-o oala, se adauga tot continutul tavii, supa si foile de dafin. Se fierbe 20-30 minute pana cand lichidul incepe sa scada putin.

Se scot foile de dafin, se adauga busuiocul si cimbrul, si se opreste focul. Se face supa piure cu blenderul, fie cu cel care se baga in oala, fie in cel cu cana, caz in care se lucreaza in cateva etape (atentie, va fi fierbinte).

In cazul in care ati folosit un blender cu cana, se pune supa inapoi in oala si se mai fierbe putin pe foc mic. Se potriveste de sare si piper. Se opreste focul, si se adauga incet frisca, cata doriti.

Apoi se savureaza decorata cu rosii, alaturi de o felie de paine calda si coaja crocanta.


The fall is coming, little by little… it's the time for one of my favorite soups.

After a Tyler’s Florence recipe and changed a little by me, this soup is perfect for the chilly days, when we’re picking the last vegetables from the garden, and inside the house smells like fresh baked bread and roasted tomatoes.

Ingredients:

2 ½ pounds mixed fresh tomatoes (plum, heirloom, cherry and vine tomatoes)
1 red bell pepper
6 cloves of garlic, peeled
2 small onions
½ cup olive oil
Salt and pepper after taste
4 tbsp butter
4 cups chicken or vegetable stock
2 bays leafs
Fresh basil and thyme leaves (you can substitute with dry)
1 cup heavy cream

Preheat the oven at 450 degrees.

Cut the tomatoes, pepper and onions in large pieces. Place the tomatoes, pepper, onions and garlic cloves on a large baking sheet, in one layer. Season with salt and pepper and drizzle with olive oil.

Roast the vegetables in the preheated oven for 30 minutes, or until caramelized.
Remove, and optional set aside few cherry tomatoes for garnish.

Heat the butter in a pot; add all the roasted vegetables, the stock and bay leaves. Bring to a boil, reduce heat and simmer for 20-30 minutes until the soup start reducing.


Remove the bay leaves and add the basil and thyme. Puree the soup using either an immersion blender or a regular blender. In this case, work in batches (be careful, it’s hot stuff).

If you used a regular blender, return the soup to the pot, and keep it on low heat. Check for salt and pepper. Turn off the heat and add the heavy cream, as much or as little you like.

Enjoy it decorated with roasted cherry tomatoes, along with some fresh crusty bread!

September 02, 2010

Pui Kiev/ Chicken Kiev


(Please scroll down for English version)

Se pare ca acest fel de a gati puiul vine de la Kiev. In mod traditional este un piept de pui batut, rulat cu unt si condimente, apoi prajit sau copt.

Varianta de azi are sparanghel, costita afumata sau prosciutto, si este copt, nu fiert. Se poate servi cu salata, cartofi, sau cu orice garnitura poftiti.

Ingrediente:

2 piepti de pui, taiati felii groase de 1/2 cm
8-10 felii de costita afumata, sau 4-5 felii de prosciutto, taiate jumatati
10 tulpini de sparanghel
1 cana faina
1 ou batut
1 cana pesmet
aprox 5 linguri de unt
sare si piper

Se pune o oala mica cu apa la fiert. Se incinge cuptorul la 180 de grade Celsius (350 Fahrenheit).

Sparanghelului i se rupe baza: se prinde cu o mana de baza si una de la jumatate, se indoaie usor si se va rupe singur acolo unde este fraged. La fel se fac toate tulpinile, sau se aliniaza dupa prima rupta si se taie cu cutitul.
Se taie tulpinile de sparanghel ramase in jumatati sau treimi, depinde cat sunt de lungi.

Se pun in apa care fierbe, aprox 3 minute, apoi se scot.

Feliile de pui se pun intre 2 foi de plastic (din cele cu care se acopera mancarea). Se bat cu ce aveti la indemana, ciocan de bucatarie, facalet :) pana cand sunt foarte subtiri.

Se aseaza faina, oul batut si pesmetul in 3 castronele, in ordine. Untul se taie in bucatele mici lunguiete.

Se ia o felie de pui batuta, se presara cu putina sare si piper (usor cu sarea, costita sau prosciutto sunt deja sarate), se aseaza deasupra 2 felii de costita una langa alta, sau o felie de prosciutto, apoi 2 bucatele de sparanghel de-a latul, o bucatica de unt, la un capat si se ruleaza. Se trece ruloul prin faina, apoi prin ou, apoi prin pesmet, si se aseaza cu terminatia in jos, intr-o tava unsa cu unt.

La fel se procedeaza cu restul de pui.
Se pune cate o bucatica de unt pe fiecare rulou si se baga in cuptorul incins pentru 20-25 minute, pana cand se rumeneste.


It seems like this chicken dish has the roots in Kiev. It’s traditionally a pounded chicken breast, rolled with butter and condiments, then fried or baked.

Today variation has asparagus, bacon or prosciutto, and it’s baked, not fried. It can be served along a salad, potatoes or any side dish you desire.

Ingredients:

2 boneless chicken breasts cut 1/3 inch thick slices
8-10 bacon slices, or 4-5 prosciutto slices, cut in halves
10 asparagus sticks
1 cup flour
1 egg, beaten
1 cup breadcrumbs
About 5 tbsp butter cut in small pieces
Salt and pepper

Place a small pot with water to boil, for steaming the asparagus. Preheat the oven at 350 degrees.

Remove the ends of the asparagus: place one hand at the base and the other at the half of the asparagus and bend. It’s going to snap in the right place, where is tender. Do the same with the rest of the asparagus, or align the bunch and cut after the first one.

Cut the pieces in halves or thirds, depends on how long they are.
Place in the boiling water for 3 minutes, remove and set aside.

Place one piece of chicken in between 2 pieces of plastic wrap. Beat them with a mallet until they’re very thin.

Place the flour, egg and breadcrumbs in 3 separate bowls, and place the bowls in a row.

Take one piece of chicken, season with salt and pepper (not too much salt, the bacon or prosciutto is already salted). Lay 2 strips of bacon side by side, or lay one slice of prosciutto. Place 2 asparagus tips crosswise and a small piece of butter and roll the chicken around the asparagus and the butter.

Dip the roll in flour, the in egg and then in breadcrumbs. Place in a butter baking dish, with the seam on the bottom. Do the same with the rest of the chicken slices.

Place one piece of butter on top of each roll. Place the dish in the preheated oven and bake for 20-25 minutes, until is golden brown.

Enjoy!

LinkWithin

Related Posts with Thumbnails